Tuesday, August 17, 2010

Just a quickie before I leave for yet another China trip

Leaving on a jet plane... All my bags are packed and I'm standin' here outside your door. Well, not quite. Nothing is packed, but I'll have an hour tomorrow morning I guess, have to leave by 9.

So - just a few pics of two rainbow trouts we made last weekend. We discovered cedar planks, partly because we still have about 2000 sqft of cedar siding in our garage, courtesy of our contractor whose strength clearly wasn't math.... Untreated, so really good for BBQ as we recently discovered.


The trout were filled with parsley and lemon, salted and peppered, and then wrapped in bacon. We soaked the cedar plank in water for about an hour - that almost smelled better than the food I was preparing!


On the grill they went. You can see the fat of the bacon slowly leaching out. We had one flame-up, which we got in check with a water spray bottle pretty easy. They were on there for about 15 minutes, perhaps a bit longer just because our plank was so thick. The cedar will start smoking and put a great flavor into the fish, without generating carcinogenic compounds as you don't have any of the fat flaming up and burning onto the wood. It's also much easier to handle. You don't need to turn, the fish just slowly cooks to perfection.

We'll try chicken soon, but I first need to get that bag packed I think! See you at the other end of this trip, no access to blogspot while I'm gone!

Wednesday, August 11, 2010

Breakfast Quinoa

Just a quickie post today, I have soooo much work today! I'm home alone and free to eat when and what I want. Almost at least, I really have to drop a few pounds so it has to be sensible. I really wanted something sweet, for a few days, but cakes or cookies are out. So I decided to combine a late breakfast with an early lunch, and my daily intake of fruit. Quinoa also sounded really good.

I browned a cut up nectarine in some basil olive oil (which I had just made in the pan I was trying to use, a bit of butter would have done as well), then added 1/4 cup of black quinoa and a scant 1/2 cup of water. Turned the heat up, cooked for 40 minutes, added 1/2 cup of freshly picked blackberries from the backyard, cooked it for another 5 minutes.

Isn't it pretty?

Monday, August 9, 2010

Cold Tomato Soup? With Vanilla Cream?

This post could also be called: "Why should you try things that sound weird?". The NYT's Diner's Journal Blog had a recipe on a Gazpacho with Vanilla Cream last week. It wasn't just the vanilla cream that was weird (the soup is salty, after all), but it also used a bottle of lemon flavored Perrier. The lemon flavored Perrier was the inspiration to the recipe, but I'm not keen on buying water that gets shipped over from France - period. Stupid recipe I thought.

Until I came across very reasonably priced organic tomatos at the farmers market. And lemons. And so I figured I could take another look at the recipe, and reinvent it in the same spirit. And perhaps the vanilla cream wasn't so bad after all.

The recipe calls for tomato paste - don't have any, so I opted for oven drying the slightly salted tomatos for 2 hours at 250 F. The tomatos had plenty of wonderful summer flavor, I just wanted to get a little of the water out.


And I wanted to remove the skins - these tomatos had pretty thick skin, and I just didn't fancy chewing on little bits of skin. They went in the blender, along with a peeled cucumber, some lemon zest and lemon juice and a little cream. I left out the tomato paste, the Perrier, and the salt - I had salted my tomatos before they went in the oven. And no need to splurge on fleur du sel unless you put it over in the last second. While still in the blender I put in some of my best olive oil. Not too much, but enough to give the soup some body. I put it in a bowl and stashed it in the freezer.

Just before serving I added a splash of carbonated water, to give it a little fizz. I'm not sure it actually did much, but it fizzled nicely. And I made a little bit of whipped cream - perhaps 1/4 cup before beating it - with the vanilla pulp of half a pod - I thought that was plenty.


The result is amazing! It's a very sublime taste, the lemon and its zest brings the tomato flavor out in full force. The EVOO makes it nice and thick. And the vanilla cream - what can I say - it sounds weird, but it rounded everything out. We had guests that night, and they said that it was better than what they had at one of our towns great restaurants the night before. For $8 / bowl!

Sorry, no recipe as I didn't measure anything, but I hope between my description and NYT recipe you'll be all set.

Friday, August 6, 2010

More Porky Goodness: Wine Marinated Pork Chops

Moving from head to toe on my pig (yes, I still have a trotter in my freezer and am pondering what to do with it) I'm making it across the nice cuts. Ok, pork chops usually tend to be on the dry side, tender - yes, but quite something to chew on. I had made one of the chops a few weeks ago, after brining it for a few hours, and it was great in taste, but it still had a bit of that pork chop dryness.

So I turned to Julia Child. And read about marinades. For pork. One caught my eye, which was a wine marinade. This made sense to me - it's not just about pumping water and spice in the meat as you do with a brine, but the acid in the wine probably also helps with tenderizing the meat. After all, that's what you do with a Sauerbraten, which is a tough piece of beef that you marinate in wine for days, and that in the end turns out nice and soft.

I winged it a bit (what's wrong with me, following recipes seems next to impossible to me). I made a marinade with wine, mustard, loads of herbs and garlic, and a bit of olive oil.


The meat was fairly lean, with a wide strip of pork fat around it. I left it in the marinade for a few hours, outside on the counter, and I turned it about every half hour. Magic was happening. A few minutes on the grill, and it was transformed in one of the best pork chops I ever had.


The sauce is the leftover marinade, reduced to where it had a creamy consistency and tasted almost like a vinaigrette. Usually I'd cut the fat off, not really for calories, mostly for its nasty taste. But here?


It was wonderful. The meat was slightly pink, and together with the fat we had super tasty morsels of porky goodness....The sauce complemented the sweetness of the pork just right. 

Saturday, July 31, 2010

Merci beaucoup, Madame! - Taste test of the fromage de tete

Here's the promised follow-up with the taste test. I was skeptical. Yes, I liked it when I tried it before we put it in the oven. I was still skeptical. I loathed it when my mom got Suelze when I grew up. Really not mine. I also really didn't like tongue growing up, and while I've had it since (thanks Jeff for trying, it's just got the wrong consistency for hot pot!) it's just not my favorite.

So, here comes the fromage de tete. It unmolds beautifully as you can see.


All the nice bits and pieces of meat, and all the parsley - yum! It smells pretty good, as well. My husband is excited, he loved it growing up (quite the advantage compared to my starting point). I decide to serve it as advised by the cook: With fresh, boiled potatoes and a vinaigrette. It was supposed to be a parsley vinaigrette, but hubby doesn't like parsley, and I forgot it at the other house anyways, so I make a thyme vinaigrette. And boil these beautiful little Russian Banana Fingerlings. And add a nice green salad, perfect for the vinaigrette as well.

Tadaaaaaa!


It is soooooo good. Not just "Yeah I can eat it" good, but really really nice and yummy. It also looks much better than any of its brethren that I've eaten in my childhood. Surprisingly, it also slices really easy. Hubby doesn't like the vinaigrette as much, he prefers it with a Dijon mustard. To each his own I guess. Cornichons would have been nice with it, or perhaps the maionese de leite with loads of capers. But it's good as it is.

Merci beaucoup, Madame, de m'avoir montre comment preparer fromage de tete!

Thursday, July 29, 2010

What to do when life hands you a pig's head?

Still with me? Good. The head was part of the half pig that I shared with a friend. We were both a bit queasy about the head (You take it - no, you take it!), but we both couldn't just throw it out. There had to be something that we could make of it. I told this to my French friend, and she said that her mom makes a great pate out of pig's head. "Sulze" or "Head cheese" was what I was thinking, and the French word for it "Fromage de Tete", a literal translation of head cheese wasn't making it any better. Growing up in Germany, we'd have Suelze every once in a while, and I was never a fan of it. Chunks of mystery meat in gelatin? Urgh. Not mine. But hey, that was many moons ago and I decided that I should just give it another try. I had to do something with the head, didn't I?

So, finally my friend's mom came out to California for a visit, and we scheduled an afternoon in my kitchen. I had instructions: Before they came, I had to take the head out of the freezer, along with some tongue (the half pig we bought didn't have tongue coming with it, or at least it never made it into my freezer, so I got some lamb's tongue), and put it all in a big pot, cover it with water and a cup of white vinegar, and leave it overnight.

When they came, Mme L. cleaned everything out, then filled the pot with clean water, the head, the tongues, some salt, a bouquet garni (a bundle of herbs, with thyme, parsley and bay leaves), and an onion studded with three cloves. My pot was a bit on the small side, and I couldn't quite figure out whether it looked gross or cute, or just like food:


Yeah, it's gross for us modern city kids, but why is it worse to see the head than the bacon... Hm.

Anyways, we let it simmer for about 3 hours, until the meat fell off the bone. Then we (ok, she) took the meat out of the pot and put it on a cutting board in the sink - pretty smart move, because it continued to leak broth all over, and would have made quite the mess had it not been in the sink. I guess she didn't make it for the first time!


The meat that came off the bone looked wonderful, just the right mix of fat and meat for a nice pate. It's not for the faint of heart, though:


But again, it's better to eat it than to toss it, right? Especially if you can make something really yummy out of it... Everything got cut up into fairly small bits, and put in a bowl. In the meantime we reduced the broth, so that we could use the natural gelatin in the broth rather than having to use additional gelatin.

The meat got mixed with lots of finely chopped parsley, probably two good handfuls, and two small finely chopped onions. Then we added some of the stock, just enough to almost cover the solids. (I was glad, I can't stand chunks of meat suspended in aspic - so 70s!).


Add more salt and pepper. Mme L.'s advice was to oversalt at this stage because it becomes blander when it sets. I took a spoonful and it was absolutely delicious!

This mixture was put into pans - I guess you really want to use nice ceramic pans, but all I had were plain metal ones... They go into the oven, in a water bath, at 410 F, for 30 minutes, and then get left in the oven overnight to cool and set.


Mine weren't quite set in the morning, but after a few hours in the fridge they looked good. And I still had lots of broth leftover, after reducing it much more I'll put it in the freezer - perhaps it'll get turned into soup dumplings?!?

I'll post a pic of the result along with a taste test over the weekend, but I wanted to document the recipe before I forget. And keep the tension going here so you come and check back - provided the pics on the top haven't grossed you out completely.

Recipe:


Fromage de tĂȘte persillĂ©

1 pig head
1 pig tongue (although I used lamb...)
1 cup of white vinegar
1 onion
3 cloves
1 bouquet garni
salt
2 small or 1 big onion
2 handful of parsley
salt and pepper

Soak head and tongue in vinegared water overnight. The next day, take out, clean the meat, put back on the stove with next 4 ingredients, covered with water. Bring to a boil, skim foam off the surface, then boil for 3 hours until the meat falls of the bone.

Place a cutting board in the sink, put the meat on, and cut it into small pieces and place in big bowl. Put broth back on stove to reduce. Finely chop onion and parsley, add to the meat. Add some of the reduced broth to the mixture, just enough to make everything nice and moist. Salt and pepper, a little more than to taste.

Place in the oven, in a waterbath, 30 minutes at 410 F. Turn off oven, leave in overnight.

Serve with boiled potatoes, a parsley vinaigrette, and cornichons (small French pickles). But that's really another story and shall be told in a few days!

Monday, July 26, 2010

Michelle and Bill's Wedding Cake

I'll start off saying that I'm sorry about the picture quality. I only brought my iPhone to the wedding, hence the low quality. Plus, in the relative panic of making the cake I also only used the iPhone. Blame it on the jet lag. I'm sure I'll get a nice pic of the cake sometimes soon and will update the post. However, I had a few good learnings so I figured I'll share right away.

Here is the final product, serving its main purpose:


For starters - what's in the cake? The top, middle and bottom layers were Chocolate Oblivion Truffle Tortes, the remaining two were Cordon Rose's Cheesecakes. All were frosted with White Chocolate Ganache, surrounded by a white chocolate band, and topped with berries. The size of the tiers was 12", 10", 8", 6" and 4". The highlights of the ingredient list were 50 eggs (happy, of course), 5 lbs of chocolate, 3 lbs of butter and sour cream. There were 90 guests, and we still had lots of cake left at the end.

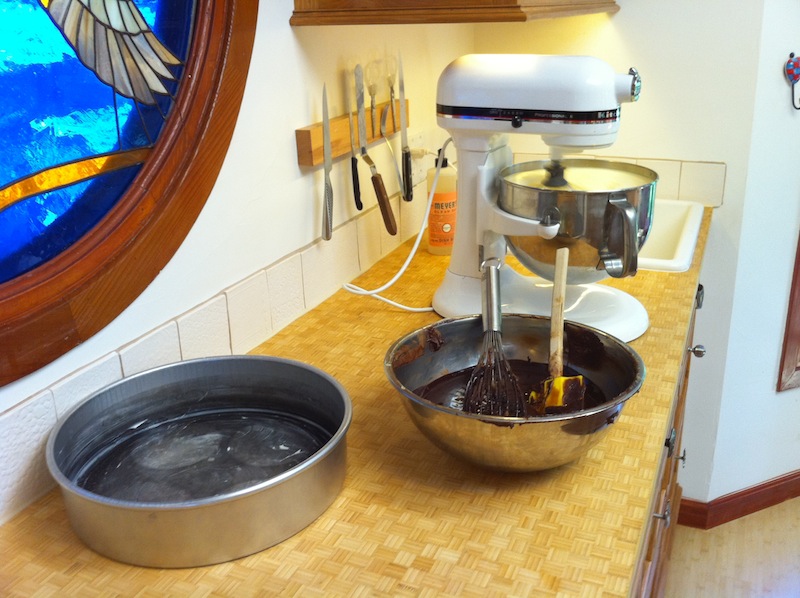
To the details: I needed the layers to be 2.5 to 3" thick. No problem with the cheesecake, especially since I sandwiched the cheesecake between biscuit layers. But it is a slight problem with the Oblivion. Plus it's just waaaaayyyyy too much beaten egg to make 3.75x the original recipe in one go. I decided to bake two thinner layers, joined by a bit of ganache in between. Here are two takes of the process:


My 6 quart Kitchen Aid bowl was full to the brim as you can tell. Both were baked to about 148F internal temperature, a little longer than recommended in the recipe due to their size. I didn't have a big enough pan for a water bath, so I ended up putting the pan on a cookie sheet, filled with water, and surrounded by multiple layers of wet cloth, fashioned out of old sheets.


The front cake still has the contraption around it, slightly browned. It'll be folded up and put in the back of the cupboard for the next time I'm in need of a big waterbath.

The cheesecakes were uneventful, I think a 5 year old that can read could make them. Hubby had to help this time as I had to stay a day longer on a business trip and time was getting short for the prep, and while he was sweating over the smaller oblivions he had no problems whatsoever with the cheesecake.

The frosting was a white ganache. I had a few epiphanies this time - I've made and struggled with it so many times, as it tends to curdle, but in the end it all depends on the chocolate. I used Aldi's white chocolate this time and had no problems. Their chocolate also contains cocoa butter, but is very soft, melts easily, and is very yellow. Previously I've used Valrhona and Guittard, and both of them are prone to curdling.

The nice thing about using chocolate bands is that I didn't have to worry at all about how the frosting went on, as it's just use to stick the chocolate band on, none of it can be seen.


You can see my rather sloppy job.... 2 minutes per cake - done. None of the painstaking smoothing and squaring and despairing. Though I have to say that the investment in a turntable really paid off, as I say each time I use it.

The chocolate bands also are surprisingly easy.


You need to do a little math (really only a little) to calculate the circumference (for those math challenged amongst us - it's the diameter (aka pan size) times Pi (3.14)). Round the result up by about an inch to account for the added diameter due to the frosting, and for a bit of overlap, and write down everything. I used two chocolate bands for the two large layers, but I'd do in in one next time, especially when I have a helper.

Next you cut wax paper in stripes that are high enough (4" in my case), and long enough. Then you pour the melted chocolate on, and spread it out. I used the bottom of the wax paper to get a straight line for the bottom of the cake. And to get the top wavy, I cut top edge on the chocolate once it had hardened. Then carefully pick up the chocolate band, and wrap it around the cake. For the small cake I warmed the chocolate with my hand so it didn't crack. It's really easy. The biggest mistake you can make is to not let the chocolate harden enough, two of my layers were made when the kitchen was too warm and they got a bit of a krinkle look.

When the chocolate band adheres nicely, you can pull the wax paper off, and you're done!


Luckily we had a spare fridge in the garage, the leftover from our kitchen remodel, so there was no problem storing the cakes when they were done.


We transported the cakes to the wedding in the trunk. The chocolate band makes them fairly robust, and they are easy to stack, just by lifting them with a spatula on one side, and helping with your hand on the other. Much less dramatic than stacking a frosted cake! Of course I used Rose's time tested straw architecture inside, and even standing in 80 F for 3 hours didn't do anything to the cake, even though I was worried about the lower cheesecake layer.

Here it is again.... Hope I'll have the better pics soon!