Here is the final product, serving its main purpose:

For starters - what's in the cake? The top, middle and bottom layers were Chocolate Oblivion Truffle Tortes, the remaining two were Cordon Rose's Cheesecakes. All were frosted with White Chocolate Ganache, surrounded by a white chocolate band, and topped with berries. The size of the tiers was 12", 10", 8", 6" and 4". The highlights of the ingredient list were 50 eggs (happy, of course), 5 lbs of chocolate, 3 lbs of butter and sour cream. There were 90 guests, and we still had lots of cake left at the end.
To the details: I needed the layers to be 2.5 to 3" thick. No problem with the cheesecake, especially since I sandwiched the cheesecake between biscuit layers. But it is a slight problem with the Oblivion. Plus it's just waaaaayyyyy too much beaten egg to make 3.75x the original recipe in one go. I decided to bake two thinner layers, joined by a bit of ganache in between. Here are two takes of the process:
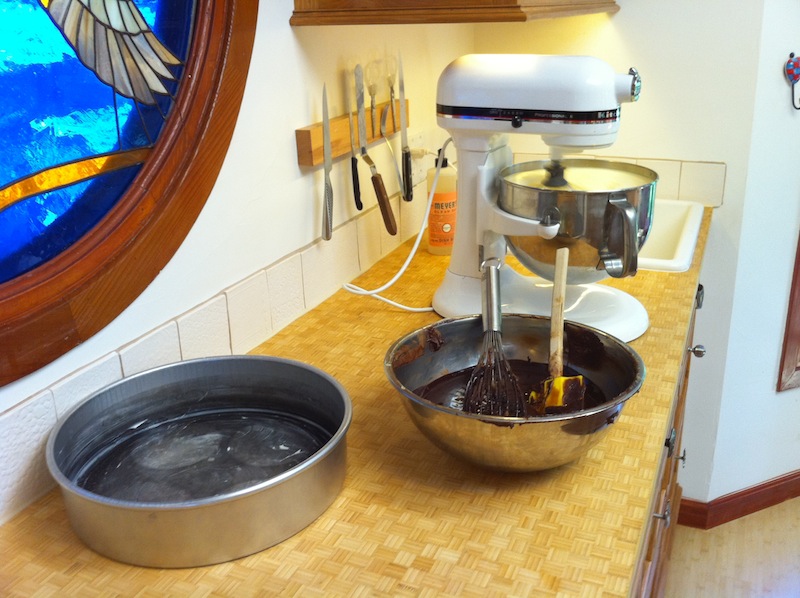

My 6 quart Kitchen Aid bowl was full to the brim as you can tell. Both were baked to about 148F internal temperature, a little longer than recommended in the recipe due to their size. I didn't have a big enough pan for a water bath, so I ended up putting the pan on a cookie sheet, filled with water, and surrounded by multiple layers of wet cloth, fashioned out of old sheets.

The front cake still has the contraption around it, slightly browned. It'll be folded up and put in the back of the cupboard for the next time I'm in need of a big waterbath.
The cheesecakes were uneventful, I think a 5 year old that can read could make them. Hubby had to help this time as I had to stay a day longer on a business trip and time was getting short for the prep, and while he was sweating over the smaller oblivions he had no problems whatsoever with the cheesecake.
The frosting was a white ganache. I had a few epiphanies this time - I've made and struggled with it so many times, as it tends to curdle, but in the end it all depends on the chocolate. I used Aldi's white chocolate this time and had no problems. Their chocolate also contains cocoa butter, but is very soft, melts easily, and is very yellow. Previously I've used Valrhona and Guittard, and both of them are prone to curdling.
The nice thing about using chocolate bands is that I didn't have to worry at all about how the frosting went on, as it's just use to stick the chocolate band on, none of it can be seen.

You can see my rather sloppy job.... 2 minutes per cake - done. None of the painstaking smoothing and squaring and despairing. Though I have to say that the investment in a turntable really paid off, as I say each time I use it.
The chocolate bands also are surprisingly easy.

You need to do a little math (really only a little) to calculate the circumference (for those math challenged amongst us - it's the diameter (aka pan size) times Pi (3.14)). Round the result up by about an inch to account for the added diameter due to the frosting, and for a bit of overlap, and write down everything. I used two chocolate bands for the two large layers, but I'd do in in one next time, especially when I have a helper.
Next you cut wax paper in stripes that are high enough (4" in my case), and long enough. Then you pour the melted chocolate on, and spread it out. I used the bottom of the wax paper to get a straight line for the bottom of the cake. And to get the top wavy, I cut top edge on the chocolate once it had hardened. Then carefully pick up the chocolate band, and wrap it around the cake. For the small cake I warmed the chocolate with my hand so it didn't crack. It's really easy. The biggest mistake you can make is to not let the chocolate harden enough, two of my layers were made when the kitchen was too warm and they got a bit of a krinkle look.
When the chocolate band adheres nicely, you can pull the wax paper off, and you're done!

Luckily we had a spare fridge in the garage, the leftover from our kitchen remodel, so there was no problem storing the cakes when they were done.

We transported the cakes to the wedding in the trunk. The chocolate band makes them fairly robust, and they are easy to stack, just by lifting them with a spatula on one side, and helping with your hand on the other. Much less dramatic than stacking a frosted cake! Of course I used Rose's time tested straw architecture inside, and even standing in 80 F for 3 hours didn't do anything to the cake, even though I was worried about the lower cheesecake layer.
Here it is again.... Hope I'll have the better pics soon!


 Posts
Posts